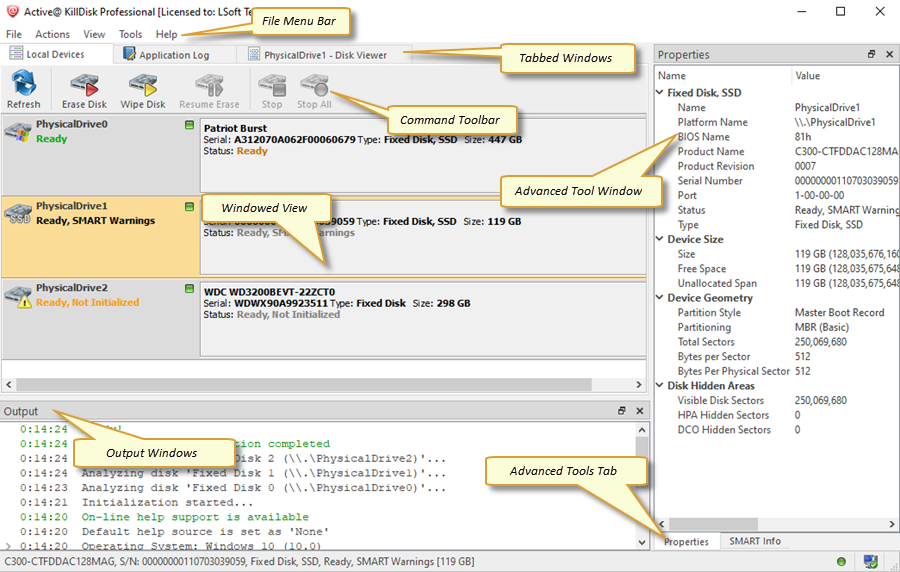
Once the KillDisk application is launched the main
application's dashboard appears. From here you can use any of KillDisk's tools.
This section describes main components of the application and
navigation. The full functionality and features of these components are discussed in corresponding sections later.
Figure 1: KillDisk Dashboard
Where:
File Menu Bar
The file menu bar contains actions to perform nearly any operation in KillDisk such as accessing Settings and
Help sections, changing Views and what is visible in the dashboard, opening tools as well as navigating between
KillDisk's windows.
The command toolbar is a dynamic toolbar that allows the user to perform Tabbed Window-specific actions (depending on the
context).
View Selection
View selection only available in Disk Explorer view and allows you to manipulate how the Bays are displayed
in the Windowed View as well as manipulating with type of objects used to show in Disk
Bays View.
Windowed View
Contains the window that is currently active. By default you can see here all HDD/SSD/USB disks attached to the workstation.
Output Window
Contains the log of actions KillDisk has performed.
Advanced Tools Tabs
These tabs allow to navigate between the different Advanced Tools.
Advanced Tools Window
This window shows the data for the Advanced Tool selected. The window can be moved, popped out and re-sized.
To browse through each of these Views click on the appropriate tab. You may also open a View from the View menu:
Figure 2: Access to Views via Menu
To open any View being closed, just select it from the View menu.
The status bar at the bottom of the workspace shows the current status of the application or status of the activity in progress.