5.3.1 DOS Interactive Mode (continued)
5.3.1.1 Erasing the Data
When you select a physical device (for example, Hard Disk 0), the erase command processes partitions no matter what condition they are in. Everything must be destroyed.
If you want to wipe data residue from unoccupied drive space, see 3.3.1.2 Wiping the Data.
If you want to erase data on selected logical drives, follow the steps in 3.4 Erasing and Wiping Logical Drives.
- Be certain that the drive you are pointing to is the one that you want to erase. All data will be permanently erased with no chance for recovery.
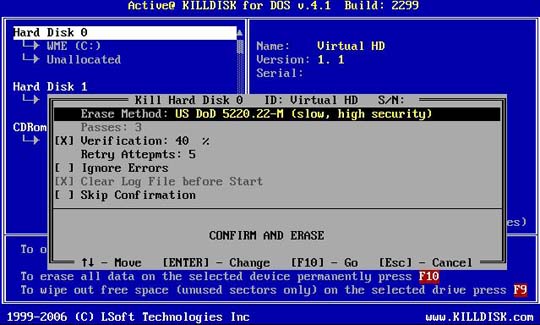
- When you have selected the device to erase, move the cursor to that device. To permanently erase all data on the selected partition, press [F10]. The Erase Method screen appears.
Erase Method

To select a different erase method, press [Enter]. Erase methods are described in Chapter 6 of this guide. Use the keyboard arrow keys to select the erase method that you want to use. Press [Enter] to use the selected method.
- To change another parameter, use the arrow keys to move the cursor to the parameter. For information on these parameters, see Chapter 6 of this guide.
- The square brackets represent a check box. To clear the check box if it is selected, select the parameter and press the spacebar. Similarly, to select the check box if it is clear, select the parameter and press the spacebar.
- To change a number in a parameter, select the parameter and press [Enter]. Type a number and press [Enter] to accept the number.
- After parameters have been set, move the cursor down to CONFIRM AND ERASE.
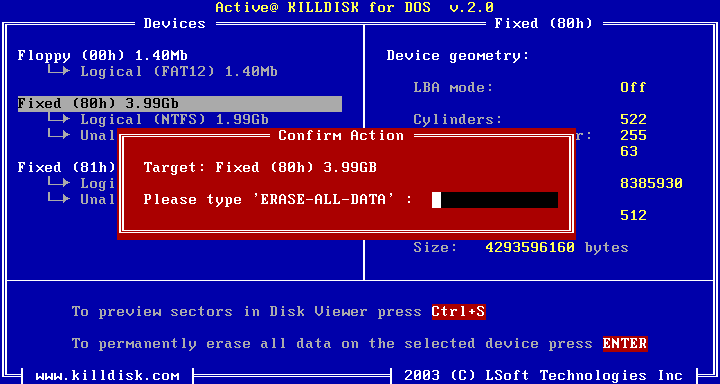
- To advance to the final step before erasing data, press [Enter]. The Confirm Action screen appears.
Confirm Action

- This is the final step before removing data from the selected drive for ever. After the process has started, you may stop it by pressing the [Esc] key.
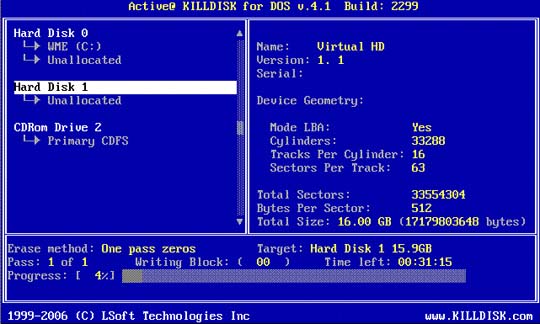
Type ERASE-ALL-DATA and press [Enter]. Progress of the erasing procedure will be monitored in the Disk Erasing screen, similar to the one below.
Disk Erasing in Progress

- To stop the process for any reason, press the [Esc] key. Please note, however that data that has already been erased will not be recoverable.
- There is nothing more to do until the end of the disk erasing process. The application will operate on its own without user intervention.
If there are any errors, for example due to bad clusters, they will be reported on the Interactive screen. If such a message appears, you may cancel the operation (by pressing [Esc]), or you may continue erasing data.
At this point, link to the steps to either erase the data or wipe the data.
Before < Running Active@ KillDisk for DOS: Erasing the Data >
Next
|
This document is available in PDF format,
which requires Adobe® Acrobat® Reader
(Free download):
|


